Janssen client-api Documentation
Introduction
Janssen client-api exposes a simple API which developers can use to help them authenticate users with OpenID Connect, get OAuth access tokens, and to implement an UMA Resource Server or Client.
The reality is that calling the /token and /authorization endpoints using protocols like OpenID Connect, UMA and OAuth is quite complex. There are many parameters you need to understand. You may have to implement complex client authentication using cryptography–beyond sending a simple client_id and secret.
The understandable first instinct of developers is to look for a native client library to help them with this task. So if you are a Java developer, and you need to use OpenID Connect, you will look for a Java OpenID Connect library. However, for organizations that have many programming platforms in use, this may mean that the organization needs to keep many libraries up to date.
Also, in cases where there are multiple Authorization Servers, burdening developers with maintaining client credentials–using adequate security–is quite burdensome. Think about a payment situation where you want to enable your customers to pay bills using their bank. But there are many banks. In cases like this, it may be easier to manage the client-OP relationship in one place.
For these reasons, the client-api was born. It provides easy to use, high level, methods that can be called with built-in REST api libraries. Developers can focus on writing their code, not understanding the myriad parameters, and mechanisms that are required by today's modern federated identity protocols.
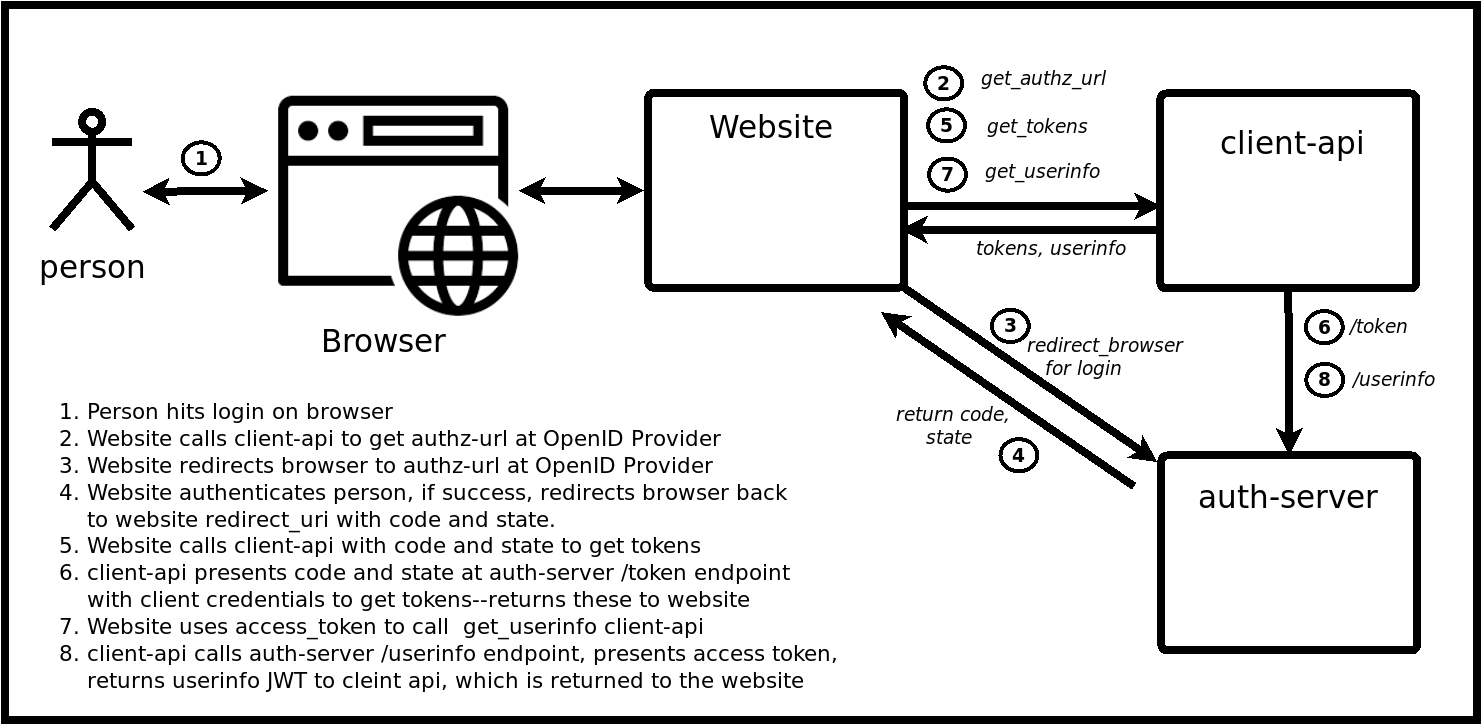
Architecture
Janssen client-api saves data in its own persistence (RDMBS, redis, etc.) and acts as RP for OP. It is possible that the admin goes to OP directly and change client data there. In that case, oxd will not know about it and can act on outdated data. To prevent this confusion user can configure client during registration so that oxd can automatically synchronize with the client data from OP whenever required. Check Register site for more details.
Get Started
To get started:
-
Install Janssen CE and ensure to hit Y when
Install client-api?is prompted while running setup scripts. -
Configure the
client-api-server -
Restart Janssen client-api server using below command.
Ubuntu 16.04 (xenial)
Operation Command Restart jans-client-api server /etc/init.d/jans-client-api-server restartUbuntu 18.04 (bionic)/Debian 9 (stretch)/CentOS 7/RHEL 7
Operation Command Restart jans-client-api server systemctl restart jans-client-api-server -
After Janssen Server Community Edition (CE) installation is completed wait for about 10 minutes in total for the server to restart and finalize its configuration. After that period, to access Janssen server CE, sign in via a web browser to
hostnameprovided during installation. For quick check whether client-api-server is alive use oxdHealth Checkendpointhttps://$HOSTNAME:8443/health-check. This should return{"status":"running"}ensuring the successful installation of client-api.
Call the client API to implement authentication and authorization against an external Authorization Server.
API
Janssen client-api implements the OpenID Connect and UMA 2.0 profiles of OAuth 2.0.
!!! Attention By default Janssen client-api allows only localhost to access its apis. To make request from another server or VM add its ip-address to bind_ip_addresses array in jans-client-api-server.yml. Check bind_ip_addresses in configurations for details.
Before using Janssen client-api you need to obtain an access token to secure the interaction with client-api-server. You can follow the two steps below.
- Register site (returns
client_idandclient_secret. Make sure theuma_protectionscope is present in the request andgrant_typehasclient_credentialsvalue. Ifadd_client_credentials_grant_type_automatically_during_client_registrationfield in/opt/oxd-server/conf/oxd-server.ymlis set totruethenclient_credentialsgrant type will be automatically added to clients registered using oxd server.) - Get client token (pass
client_idandclient_secretto obtainaccess_token. Note ifgrant_typedoes not haveclient_credentialsvalue you will get error to check AS logs.)
Pass the obtained access token in Authorization: Bearer <access_token> header in all future calls to the client-api-server.
OpenID Connect Authentication
OpenID Connect is a simple identity layer on top of OAuth 2.0.
Technically OpenID Connect is not an authentication protocol–it enables a person to authorize the release of personal information from an "identity provider" to a separate application. In the process of authorizing the release of information, the person is authenticated (if no previous session exists).
Authentication Flow
Client-api supports the OpenID Connect Hybrid Flow and Authorization Code Flow for authentication.
Learn more about authentication flows in the OpenID Connect spec.
Client-api Authorization Code Flow
You can think of the Authorization Code Flow as a three-step process:
- Redirect a person to the authorization URL and obtain a code /get-authorization-url
- Use the code to obtain tokens (access_token, id_token and refresh_token) /get-tokens-id-access-by-code
- Use the access token to obtain user claims /get-user-info
UMA 2 Authorization
UMA 2 is a profile of OAuth 2.0 that defines RESTful, JSON-based, standardized flows and constructs for coordinating the protection of APIs and web resources.
Using jans-client-api, your application can delegate access management decisions, like who can access which resources, from what devices, to a central UMA Authorization Server (AS) like the Janssen AS.
Native Libraries
Client APIs are swaggerized! Use the Swagger Code Generator to generate native libraries for your programming language of choice.
It is easy to generate appropriate client via https://app.swaggerhub.com GUI, just add swagger spec and in upper right corner it's possible to download client.
Compatibility
Janssen client-api has been tested against the following OAuth 2.0 Authorization Servers:
OpenID Providers (OP)
UMA Authorization Servers (AS)
Tutorial
Follow one of our tutorials to learn how client-api works:
Source code
The jans-client-api source code is available on GitHub.
License
Janssen Server is available under the AGPL open source license.
Support
Gluu offers support for Janssen on the Gluu Support Portal. In fact, we use oxd and a Gluu Server to provide single sign-on across our oxd portal and support app!
For guaranteed response times, private support, and more, Gluu offers VIP support.